RSS구독하기:SUBSCRIBE TO RSS FEED
즐겨찾기추가:ADD FAVORITE
글쓰기:POST
관리자:ADMINISTRATOR
'분류 전체보기'에 해당되는 글 177

Source : http://goroutines.com/10m
2017/04/13 14:22 2017/04/13 14:22
이 글에는 트랙백을 보낼 수 없습니다
[로그인][오픈아이디란?]
오픈아이디로만 댓글을 남길 수 있습니다
C, Go

a side-by-side reference sheet


Compare C and Golang sheet

http://hyperpolyglot.org/c
2017/04/13 14:09 2017/04/13 14:09
이 글에는 트랙백을 보낼 수 없습니다
[로그인][오픈아이디란?]
오픈아이디로만 댓글을 남길 수 있습니다
기존의 re 모듈의 match() 속도가 느린 것을 보다 빠르게 처리 하기 위해..

https://swtch.com/~rsc/regexp/regexp3.html
http://lh3lh3.users.sourceforge.net/reb.shtml

Library ( Python )
  • https://github.com/facebook/pyre2
    • https://github.com/axiak/pyre2/

하지만 Unicode 지원에 문제가 있음.
2017/04/12 14:12 2017/04/12 14:12
이 글에는 트랙백을 보낼 수 없습니다
[로그인][오픈아이디란?]
오픈아이디로만 댓글을 남길 수 있습니다

MacOS Shortcut sheet

https://www.danrodney.com/mac/

Go Concurrency Visualizer

https://divan.github.io/posts/go_concurrency_visualize/
2017/04/12 13:56 2017/04/12 13:56
이 글에는 트랙백을 보낼 수 없습니다
[로그인][오픈아이디란?]
오픈아이디로만 댓글을 남길 수 있습니다
HTTP 1.0/1.1 의 단점을 개선한 HTTP/2 는 HTTP 프로토콜의 보안 취약점으로 인하여
SSL 의무적으로 이용하도록 정의 되어있다.

HTTP 대비 성능 대비 비용이 크다는 관습적인 경험과
SSL 인증서 비용이 적지 않고 발급 과정 또한 수월하지 않도 않으며
그러한 작업을 1~2년 내에 또 반복해야 하는 것으로 인하여 이전은 쉽게 이루어지지 않고 있다.
하지만! 대세는 HTTPS! HTTP/2!
Let's Encrypt 프로젝트로 인하여 쉽게 인증서를 발급 받을 수 있어서 이를 이용해서 HTTP/2 를 적용해 보자.
Let's Encrypt 는 무료로 사용 할 수 있으며 3개월 마다 갱신해야 하지만
자동으로 갱신할 수 있기 때문에 부담 없이 사용하면 된다.
1. 준비
git 패키지가 설치 되 있어야 한다.
$ yum install git
1. Let's Encrypt 설치
$ sudo git clone https://github.com/letsencrypt/letsencrypt /opt/letsencrypt
$ cd /opt/letsencrypt

디렉토리를 생성해주고 
$ mkdir -p /etc/letsencrypt/configs/
그리고 letsencrypt 발급을 위해 다음 과 같은 내용의 설정 파일을  만든다.
# $ vim /etc/etc/letsencrypt/configs/foo.com.conf
domains = foo.com
rsa-key-size = 4096
server = https://acme-v01.api.letsencrypt.org/directory
email = nobody@nowhere.com
authenticator = webroot
webroot-path = <web document root directory>
letsencrypt 수행에 필요한 패키지가 없을 경우 해당 패키지를 직접 내려 받기 때문에 root 권한으로 진행하면 된다.
$ sudo ./letsencrypt-auto
3. Nginx 설치
Nginx 는 v1.9.5 이후 버젼 부터 HTTP2 를 지원하기 때문에 해당 버전 이후 Nginx 설치가 필요하다
(현재는 1.10.1 이 최신 버전)
HTTP/2 에서는 기존 HTTP1.0/1.1 과의 호환을 위해서 Protocol Negotiation 을 통해서 HTTP/2 를 사용할지 아닐지 판단하는데
SPDY 가 사용하던 "Next Protocol Negotiation (NPN)" 을 대신 Application Layer Protocol Negotiation(ALPN) 을 이용한다.
( 참고 : https://www.linuxbabe.com/nginx/difference-between-npn-and-alpn-plus-how-to-enable-alpn-on-your-site )
최신 Chrome 에서는 APLN 만 지원하기 때문에 ALPN 이 안되면 HTTP/2 를 이용할 수 없기 때문에 반드시 확인이 필요하다.
( 참고 : https://ma.ttias.be/chrome-drops-npn-support-for-http2-alpn-only/ )
이것을 확인하는 방법은
OpenSSL 1.0.2 이상의 환경에서 다음을 실행한다
( 참고 : http://serverfault.com/questions/732474/nginx-configured-with-http2-doesnt-deliver-http-2 )
$ echo | openssl s_client -alpn h2 -connect yourserver.example.com:443 | grep ALPN
# 지원하는 경우
ALPN protocol: h2
# 미 지원 하는 경우
No ALPN negotiated
혹은
https://tools.keycdn.com/http2-test
을 통해서도 확인 해 볼 수 있다.
하지만 ALPN 은 OpenSSL 1.0.2 이상을 필요로 하지만
CentOS 6.x 에서는  1.0.1 이 기본이기 때문에 Nginx 를 빌드할때 이를 정적 링크를 통해서 컴파일 할 필요가 있다.
( 참고: https://gist.github.com/kennwhite/46216acbc272395d02b2267cb10a99dd )
$ wget https://www.openssl.org/source/openssl-1.0.2h.tar.gz -O /opt/openssl/openssl-1.0.2h.tar.gz
$ tar zxf /opt/openssl/openssl-1.0.2h.tar.gz -C /opt/openssl
혹은 미리 빌드된 Nginx 를 배포하는 곳이 있다.
https://medium.com/@karljohnson/nginx-more-get-http-2-with-alpn-pagespeed-modsecurity-and-much-more-in-one-single-package-7d28a44d1854#.579o1gteq
이를 이용해 설치하는 것도 추천한다.
4. Nginx 설정
https://leandromoreira.com.br/2015/10/12/how-to-optimize-nginx-configuration-for-http2-tls-ssl/
server {
    listen 80;
    server_name foo.com;
    location / {
        return 301 https://$host$request_uri;
    }
}

server {
    listen       443 ssl http2;
    server_name  foo.com;
    ssl_stapling on;
    ssl_stapling_verify on;
    ssl_certificate /etc/letsencrypt/live/foo.com/fullchain.pem;
    ssl_certificate_key /etc/letsencrypt/live/foo.com/privkey.pem;
    ssl_dhparam /etc/nginx/ssl/dhparams.pem;
    resolver localhost;
    resolver_timeout 5s;

    ssl_session_cache shared:SSL:32m;
    ssl_buffer_size 8k;
    ssl_session_timeout 15m;

    add_header Strict-Transport-Security "max-age=63072000; includeSubdomains; preload";
    add_header X-Frame-Options DENY;
    add_header X-Content-Type-Options nosniff;

    ssl_prefer_server_ciphers on;
    ssl_protocols TLSv1 TLSv1.1 TLSv1.2;
    ssl_ciphers 'ECDHE-RSA-AES128-GCM-SHA256:ECDHE-ECDSA-AES128-GCM-SHA256:ECDHE-RSA-AES256-GCM-SHA384:ECDHE-ECDSA-AES256-GCM-SHA384:DHE-RSA-AES128-GCM-SHA256:DHE-DSS-AES128-GCM-SHA256:kEDH+AESGCM:ECDHE-RSA-AES128-SHA256:ECDHE-ECDSA-AES128-SHA256:ECDHE-RSA-AES128-SHA:ECDHE-ECDSA-AES128-SHA:ECDHE-RSA-AES256-SHA384:ECDHE-ECDSA-AES256-SHA384:ECDHE-RSA-AES256-SHA:ECDHE-ECDSA-AES256-SHA:DHE-RSA-AES128-SHA256:DHE-RSA-AES128-SHA:DHE-DSS-AES128-SHA256:DHE-RSA-AES256-SHA256:DHE-DSS-AES256-SHA:DHE-RSA-AES256-SHA:ECDHE-RSA-DES-CBC3-SHA:ECDHE-ECDSA-DES-CBC3-SHA:AES128-GCM-SHA256:AES256-GCM-SHA384:AES128-SHA256:AES256-SHA256:AES128-SHA:AES256-SHA:AES:CAMELLIA:DES-CBC3-SHA:!aNULL:!eNULL:!EXPORT:!DES:!RC4:!MD5:!PSK:!aECDH:!EDH-DSS-DES-CBC3-SHA:!EDH-RSA-DES-CBC3-SHA:!KRB5-DES-CBC3-SHA';
    ..
}
설정을 확인 하고 Reload 를 한다.
$ service nginx configtest
$ service nginx reload
5. HTTP/2 확인
Chrome 부가 기능 중 "HTTP/2 and SPDY indicator" 를 이용하면 바로 확인이 가능하다.
  • 사용자 삽입 이미지

    그리고 이 모든 것을 설정하고 나면...


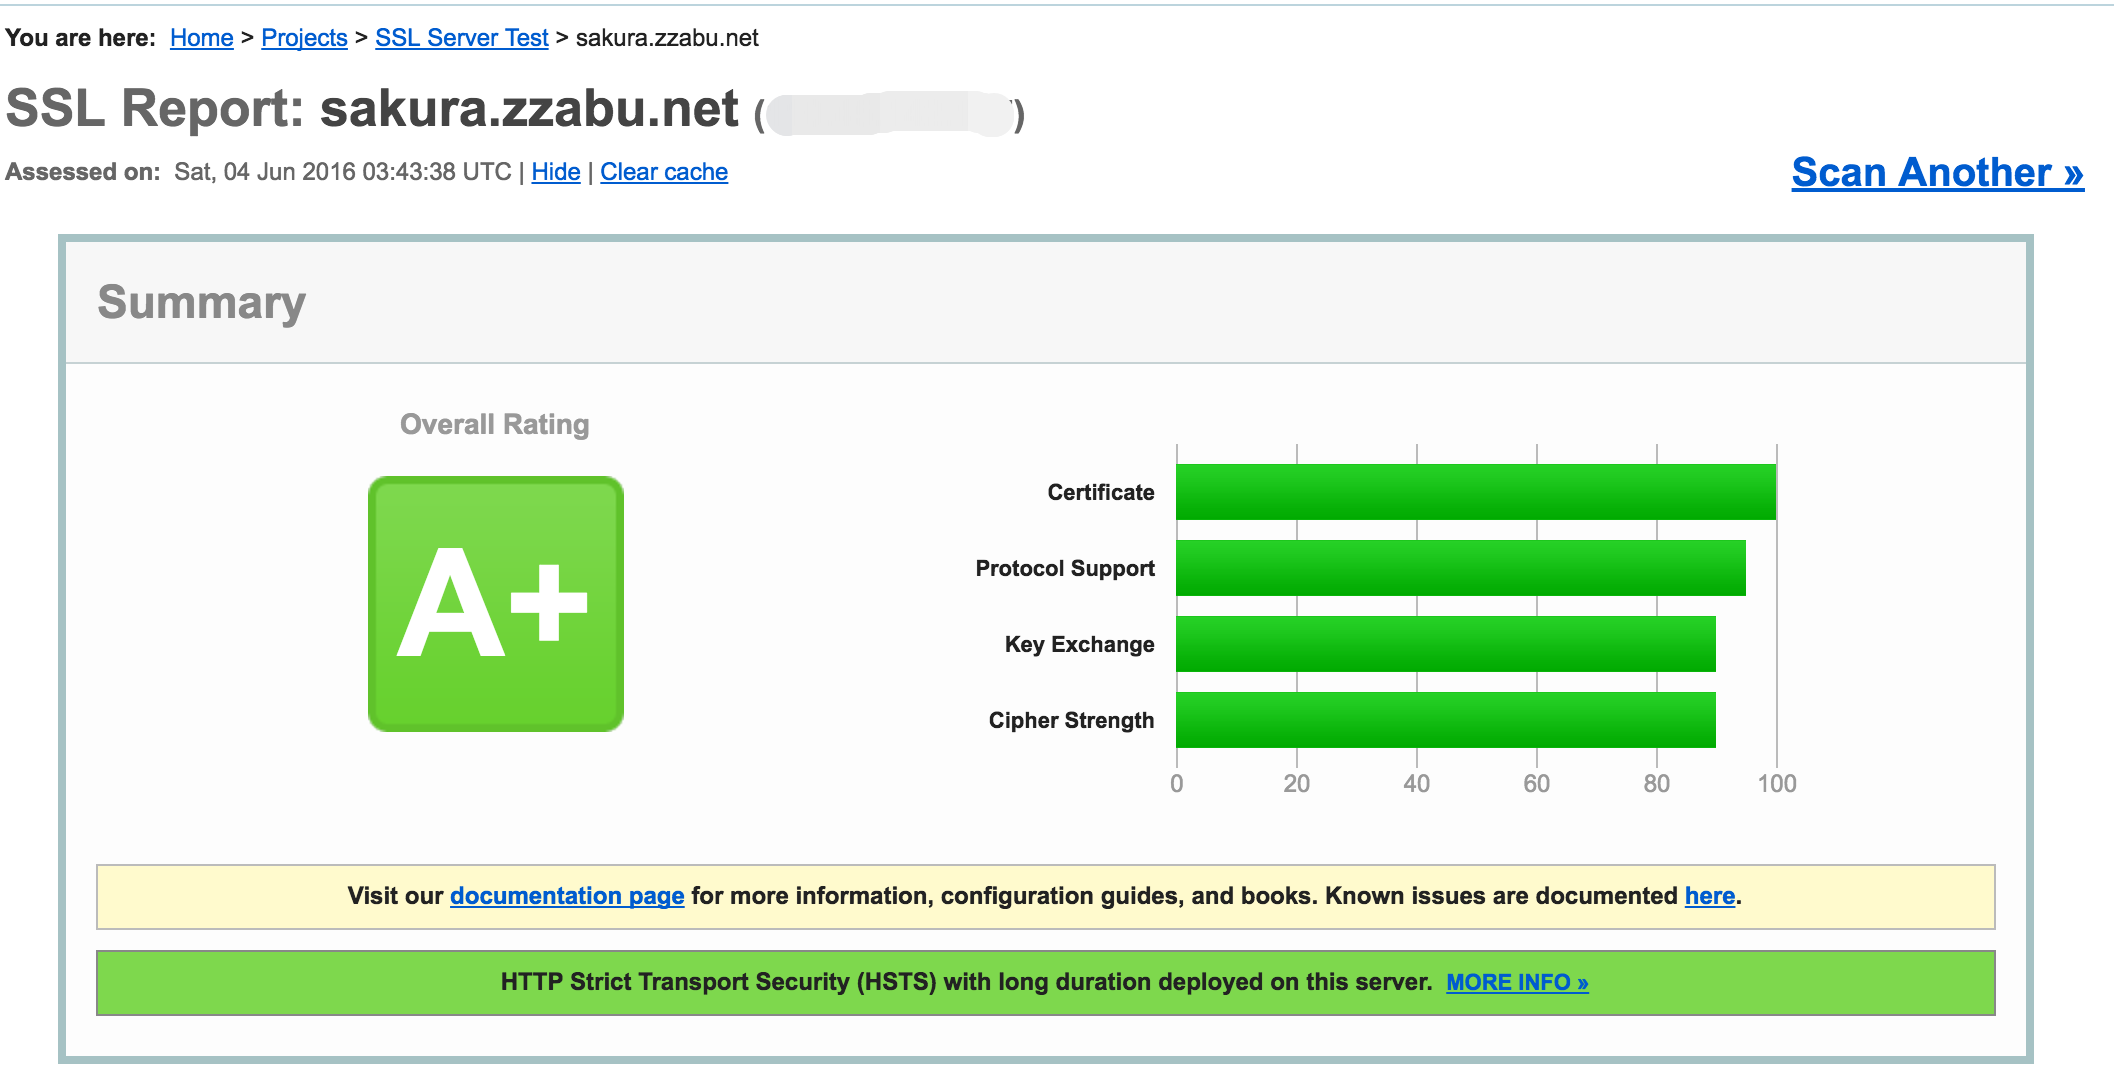
    사용자 삽입 이미지

    SSLLab 테스트 결과를 얻을 수 있다.

    참 쉽죠?


    참고:
    https://weakdh.org/sysadmin.html
    https://www.nginx.com/blog/nginx-1-9-5/
    https://www.nginx.com/blog/free-certificates-lets-encrypt-and-nginx/
2016/06/04 23:51 2016/06/04 23:51
이 글에는 트랙백을 보낼 수 없습니다
[로그인][오픈아이디란?]
오픈아이디로만 댓글을 남길 수 있습니다
Dot:Where is ......
byDot
Where is ......
전체 (177)
주절거림 (60)
윈도우벽지 (2)
Shoveling.. (9)
주워들은것들.. (48)
요집이 괜찮더라!! (0)
찍사놀이 (7)
관심꺼리~ (4)
«   2024/11   »
          1 2
3 4 5 6 7 8 9
10 11 12 13 14 15 16
17 18 19 20 21 22 23
24 25 26 27 28 29 30
  1. 내 맘대로 보는 세상  2009
    맘에 안드는 Internet Explorer 업데이트 방침!
  2. 시리니  2008
    브라우저 업데이트, 작지만 큰 실천입니다.
  3. Dinosur와 KM의 Blog  2007
    저도 보통 사람
  1. 2019/02 (1)
  2. 2018/07 (1)
  3. 2018/01 (11)
  4. 2017/12 (10)
  5. 2017/10 (1)